Repairing my mug with kintsugi
My coffee mug broke earlier this year. Naturally, you wouldn't be
reading this if it weren't avery special mug: It has accompanied me
every day for the last 10 years. Through my student days, startup days,
and early career, it has sat by my side with its goofy crocodile decals
and brightened my desk. We've shared several thousand cups of coffee. That
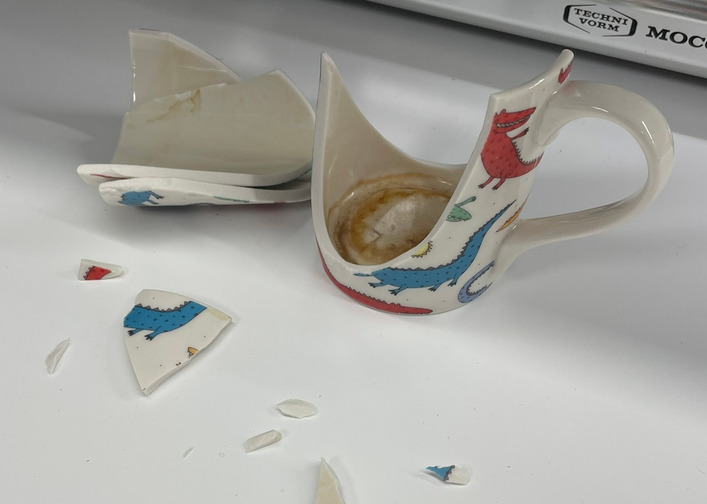
was until early February 2024. In a moment of inattentiveness, I knocked
it off the kitchen counter and, giving into the idiotic reflex of trying
to catch it with my foot, kicked it into the wall instead. I can still
hear the sound of it shattering...
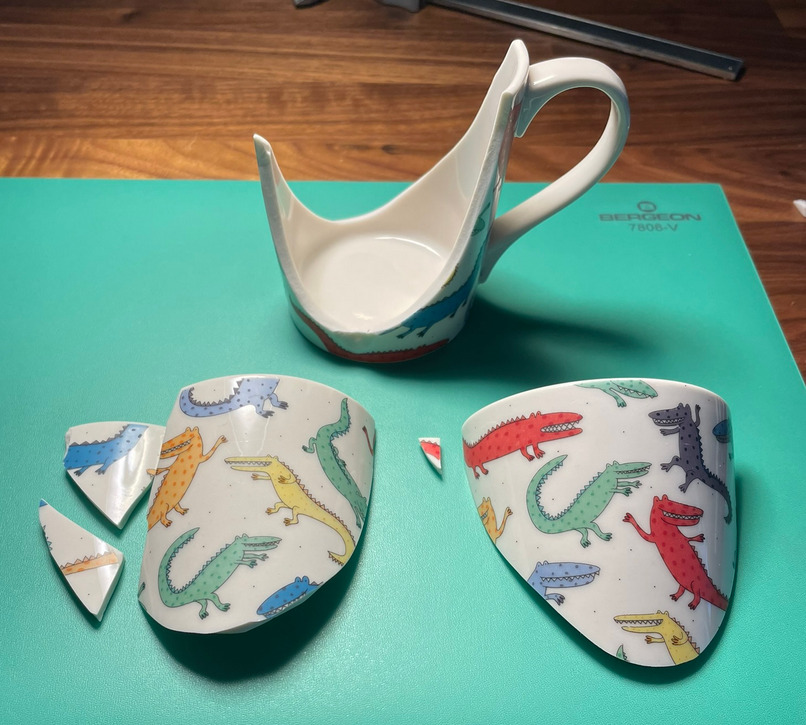
After recovering from the initial shock and collecting the sad remains
of my mug, several colleagues offered their condolences and suggested I
look into the ancient Japanese art of Kintsugi. I did, and four months
later, my coffee mug is back in action! I wanted to write this post to
share what I learned along the way.
Discussed on Hacker News.
The art of Kintsugi (Japanese: 金継ぎ)
Kintsugi is the traditional Japanese art of repairing broken pottery.
In Kintsugi, one uses natural lacquer mixed with various ingredients such
as wood powder, polishing compound, and even bread dough to repair cracked
pottery. The mended joints are then highlighted by dusting the final layer
of lacquer with gold or silver. We Westerners might find this last step
peculiar: why would you highlight a repair? In fact, why bother repairing
a broken mug at all? Shouldn't a broken thing either be discarded and
replaced, or repaired to look as good as new? According to traditional
Japanese philosophy, however, an object's imperfections are to be celebrated. They tell
the story of the object’s history.
With the shards of my beloved mug safely stowed away, I started reading
about Kintsugi and how one might go about practicing it at home. These
days, some hobbyists opt for modern epoxy instead of the traditional and
expensive Urushi lacquer. Epoxy probably yields a more robust bond and
certainly allows for quicker repairs, but I question its safety for
food-related use, especially at the temperatures found in a steaming cup
of coffee. Also, the idea of using epoxy didn't feel right to me—I
wanted to do this the proper way or not at all. That meant investing
many yen to obtain what is widely regarded as the best
Kintsugi starter kit made by the folks at TSUGU TSUGU. While waiting
for overseas shipping, I familiarized myself with the process by
watching their tutorial
over and over again.


Step 1: gluing the pieces together with mugi urushi
When your pottery has shattered into different pieces, the first step
is naturally to glue them together again. Before gluing, the pieces need
to be thoroughly cleaned and any sharp edges smoothed so that the seams
become more pronounced. This aids the later steps in the process.
Already here I encountered my first hurdle. The guides I was following
worked with clay pottery, while my coffee mug is glazed ceramic. In case
you didn't know, ceramics are surprisingly resilient; sanding it isn't
easy. I had coarse 200-grit sandpaper at hand, but a diamond file would
most likely have been a much better tool for this job.
Mistake 1: Sandpaper doesn't work on glazed ceramics.
Use a proper diamond file.
After smoothing the edges, it's wise to test-fit the pieces together: I
rebuilt the cup from its fragments using some masking tape. This allowed
me to get a feel for how they fit together, which pieces I was missing
(luckily not many), and which pieces were too small to handle. You can
rebuild a surprising amount of the object's structure with kintsugi
techniques, so leaving small shards out of the repair is not a big
problem.
All the pastes, glues, and lacquer products used by kintsugi artisans
are based on the resin obtained from the Urushi tree. Urushi lacquer
contains urushiol, an organic compound named after the tree from
which it is harvested. Incidentally, urushiol is also what makes poison
ivy... poisonous. Most humans are allergic to this compound. Gloves are
definitely recommended when working with urushi resin.
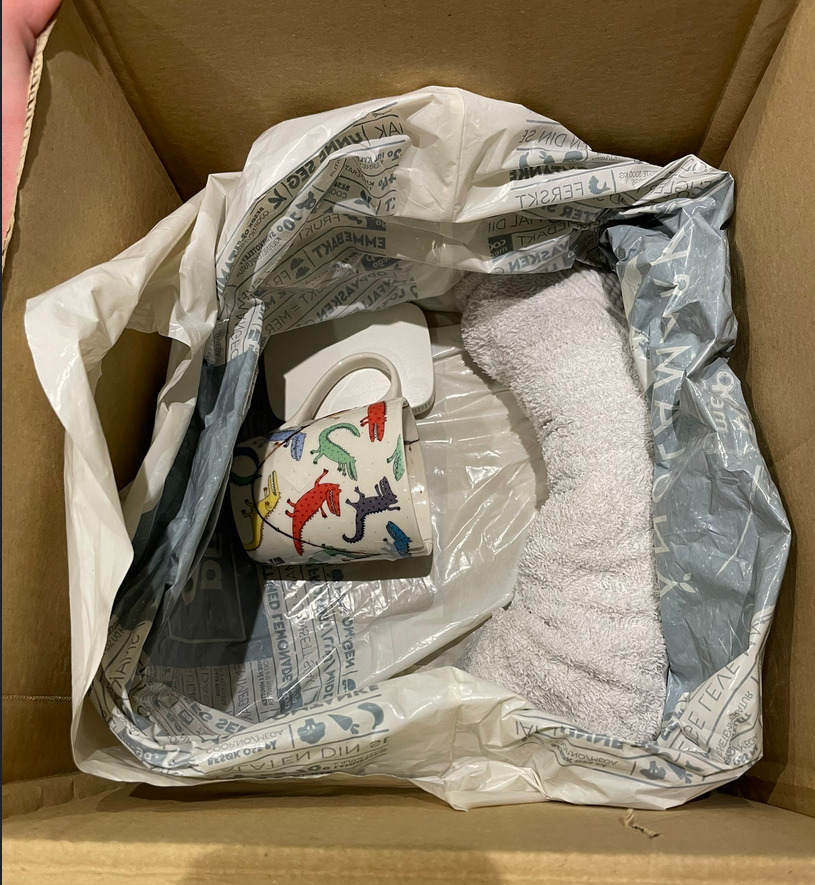
Urushiol hardens to form a very hard and scratch-resistant lacquer under
the right conditions: around 25°C and 75% relative humidity. These
conditions can be simulated by placing a wet towel in a cardboard box
and leaving it in a warm place. I managed to convince my fiancé that
this cardboard box just had to live in the bathroom cupboard and that
the hairdryer now lives elsewhere and yes this is super critical because
it's my passion project right now. I kept tabs on the environment of my
urushi box using the
world's best CO2 sensor (full
disclaimer: I work at Disruptive Technologies) to make sure I was
alerted when the conditions deviated too much from my target.
The glue used to stick broken pieces together in kintsugi is called
mugi urushi. Strangely, it's made by first mixing cake flour with
water and forming a small ball of dough. I suspect the gluten in the
dough helps achieve the right consistency. The dough is then mixed with
small amounts of raw urushi until it reaches the consistency of freshly
chewed gum. At least, that's what the kintsugi guide told me. I was
surprised when I suddenly had something indistinguishable from brown
slimy chewing gum and hoped I was on the right track.
Using a suited poking implement (the kit came with a well-shaped bamboo
stick), I smeared the sticky glue onto the edges of some of the larger
shards and pressed them together. Mugi urushi is sticky enough that
pieces will hold together fairly well, making it easy to fasten them
properly using small pieces of masking tape. The guide recommends not
gluing more than a few pieces together at once and to focus on larger
pieces to begin with. Following this advice, I planned to glue my mug
together in two sessions.
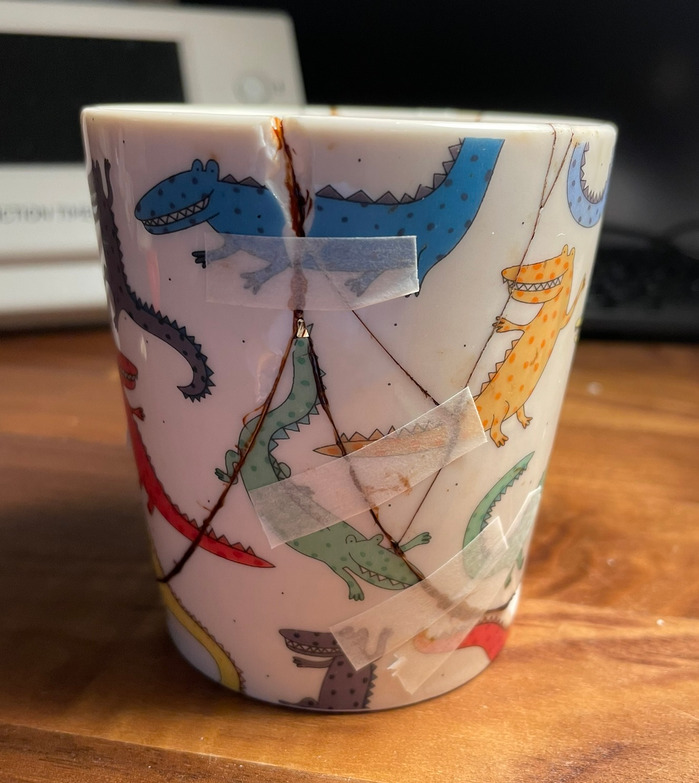
Once glued and taped, the broken pieces were placed into the humid and
warm cardboard box for around 2 weeks. At this point, the glue had
hardened to the point where scraping at the squeezeout with a razor
blade caused it to chip and flake off. If the glue feels gummy, leave it
in the urushi box for another week -- it will harden eventually. If it
doesn't, the mugi urushi might have been contaminated with oil and you
will have to start over. Dissolve the mugi urushi with acetone and
restart. I luckily did not encounter this particular problem, but that's
what Reddit recommends.
The 2nd round did not go as well. I quickly realized that my first
glue-up was slightly crooked.
Mistake 2: Even the smallest misalignment will haunt
subsequent glue-ups. Take care and plan well.
I did not test-fit the first glue-up with the other pieces before
letting it harden because I was afraid to smear the squeezeout and
smudge the ceramic surface. I now realize that this wouldn't have been a
problem, because you can easily sand away any smearing on glazed items.
For raw unglazed (rough) pottery, this is probably not the case though.
In any case, the 2nd glue-up did not go very well because of the
misalignment with the first. In hindsight, I should have started over at
this point, but oh well.
Cleaned and sanded pieces
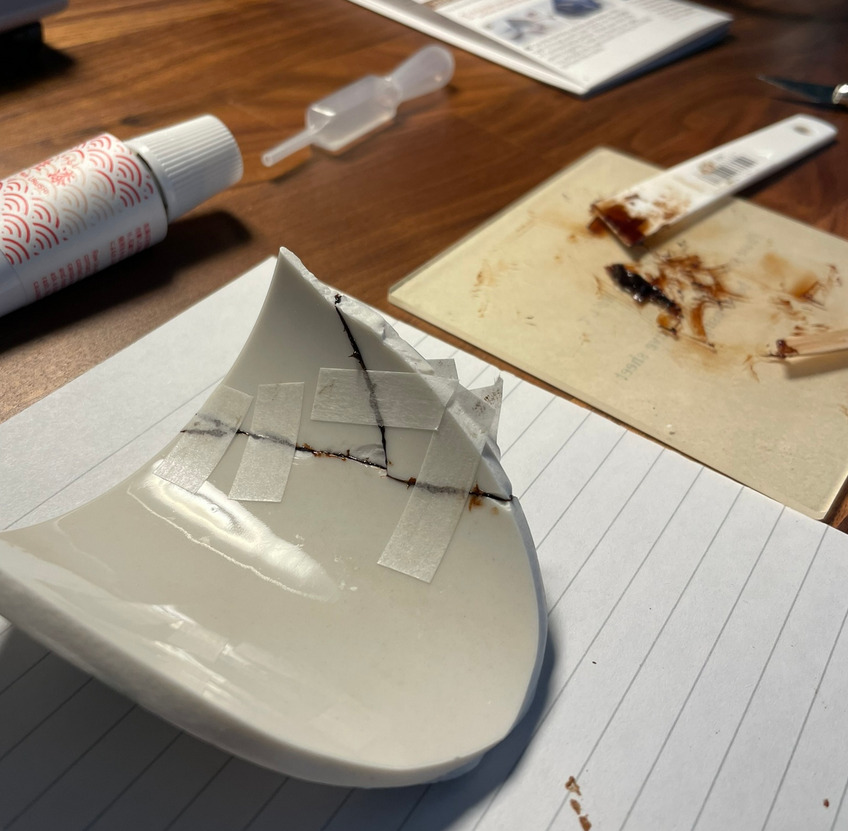
Gluing with mugi urushi
2nd round of gluing
Urushi hardens in a warm and humid box
Step 2: filling gaps with kokuso and sabi urushi
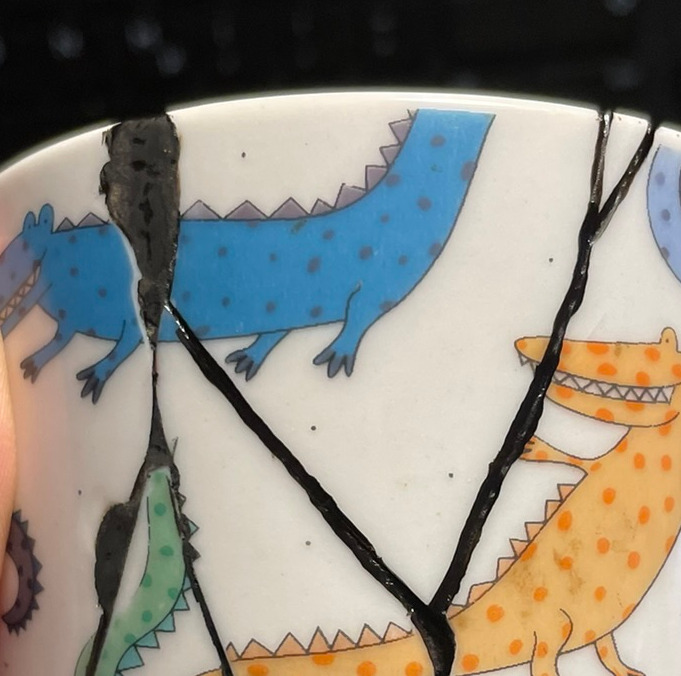
After gluing the broken pieces together, it's time to start rebuilding any
missing structure. It's hopefully evident from the photos that I'm missing
a fairly large chunk near the bottom of the mug as well as a couple of
fragments near the lip. There's even a hole straight through the ceramic!
You can also see the misalignment resulting from my haphazard glue-up in
that the rim of the cup isn't flat. A true kintsugi artist would never let
such a blemish fly. Luckily, I can go full meta and say that the
misalignment tells a story of my kintsugi journey, and the mug will be
that much more valuable for it. After all, that's the spirit of this whole
project!
Luckily, there's a process for dealing with (and celebrating) defects like
holes and missing pieces. Large holes deeper than 1 mm are filled with
kokuso. Kokuso is made by taking mugi urushi (the gum glue used
earlier) and mixing it with equal quantities of wood dust and polishing
compound. At this point I simply trust the process—I couldn't begin to
tell you why these particular compounds are used.
Once mixed, kokuso has the consistency and appearance of hard clay. I
worked kokuso into the cracks and holes in 0.5 mm layers. Kokuso can be
flattened by covering it with plastic clingfilm and pressing on it with
your finger. Between each layer, kokuso is allowed to harden for one week.
Once cured, it is sanded flush with the contours of the surrounding
geometry.
I needed two layers of kokuso to rebuild most of the structure, and the
2nd layer took several weeks to fully cure. I believe this is because I
did not clean my tools well enough. The kintsugi guide recommends cleaning
all tools with mineral oil between sessions precisely because oils will
prevent urushi from curing, and I suspect I did not do a proper job of
cleaning the oil off my spatula when making the 2nd round of kokuso.
Mistake 3: Even the smallest amount of oil will
significantly prolong cure time.
Small holes and cracks shallower than 1 mm are filled in using sabi
urushi. This is made by mixing polishing compound with water, little
by little, until it reaches the consistency of hard mayonnaise. To this,
you add raw urushi (around 60% by volume). The guide says that sabi
urushi hardens "quickly" and boy is that an understatement. In
less than 10 minutes, my sabi urushi was hard and useless. I had to
practice making sabi urushi a couple of times until I had the process
nailed before I even had time to apply it to my cracks. Unsurprisingly,
I found the ticking sabi urushi clock to be very stressful, so I will
admit that I did not spend enough time on this part of the process.
Mistake 4: Not spending enough time on the sabi urushi
process.
Had I done my job properly, I would have sanded down the hardened sabi
urushi and added several layers before moving on to the next part of the
process. I did not, and proceeded with several small holes and gaps in
my seams. These were not deep enough that I feared my mug would leak, of
course, but it's still a visual blemish.
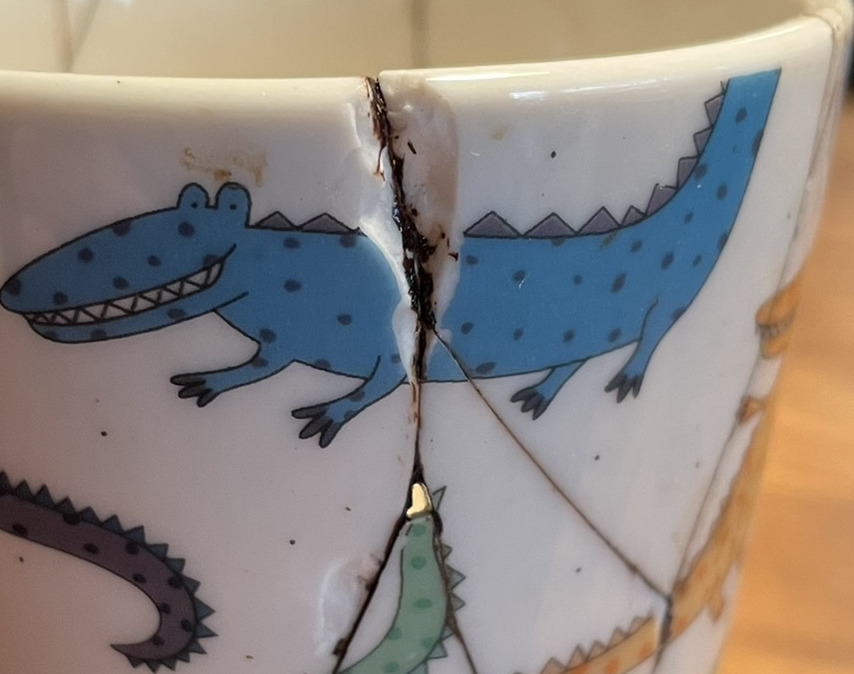
These holes need filling...

A large shard is also missing
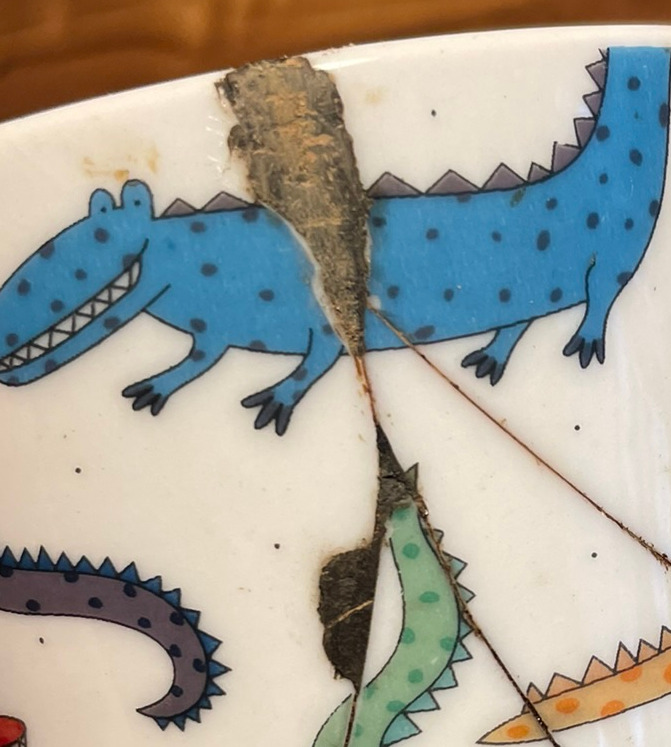
Kokuso is used to fill large voids
Sabi urushi fills smaller cracks
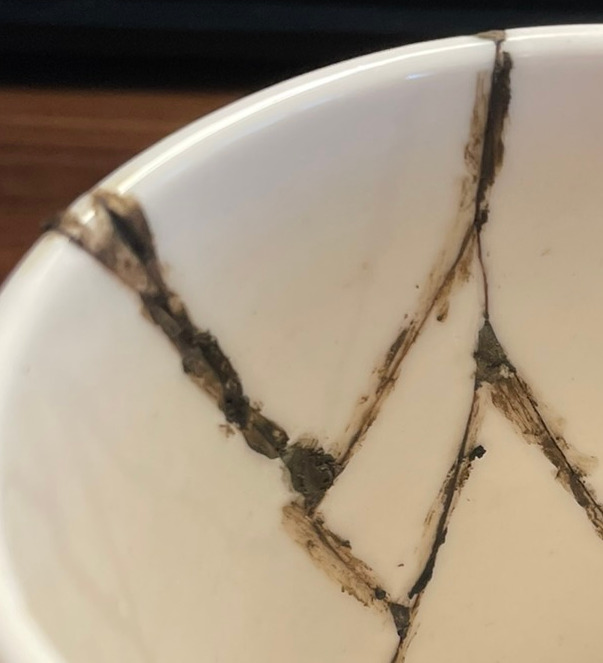
Step 3: applying black lacquer
The next step of the process is where the detail work begins. At this
point, the gaps are all filled, the cracks are smoothed over, and we are
ready to start working on the final surface finish. That's done by
repeatedly painting layers of
black urushi lacquer on top of every
part of our repair.
Black urushi is made by stirring a blob of raw urushi lacquer until it has
evaporated much of its water content. During this process, it transitions
from a dull beige color to deep wine red. To this, we can add black mica
powder to color it jet black. I don't think its color matters much at this
stage in the process. Using a fine tip paintbrush, I carefully painted the
lacquer on top of the sabi urushi. To my surprise, this was the most
difficult part of the whole process, especially painting the inside of the
mug. Save for painting houses, I have never used a paintbrush in this
capacity, nor do I have any drawing skills.
Mistake 5: Never learning to hold and use a fine-tipped
paintbrush.
Sure, I can trace a line with a ballpoint pen, but pens work in two
dimensions. Paintbrushes work in at least three: pressure widens the
brush and curves cause it to splay. Stray hairs muddle your line and you
must always be mindful of the amount of lacquer (or paint) your brush is
loaded with. I found it near impossible to paint nothing but the thin
lines of sabi urushi. This is without a doubt the part of the process
that I underestimated the most. I have gained an enormous amount of
respect for artists who paint for a living.
I laid down several layers of black urushi, making sure to cure each
layer for a couple of days and wet-sanding it smooth, to give myself
some practice with the frightfully difficult paintbrush. I noticed that
the black urushi tended to break off in flakes where I had painted
directly on the ceramic glaze rather than on the thin strip of sabi
urushi that makes up my seams. Apparently, urushi lacquer doesn't bond
very well to the glaze, and I believe I should have either (a) broken
the edges of the ceramic more thoroughly prior to gluing to widen the
seam or (b) pre-sanded the glaze along the seams.
Mistake 6: Not providing a scored base for the black
urushi to bond with the ceramic.
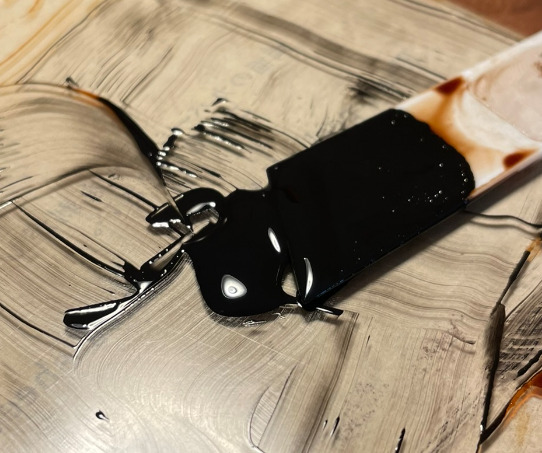
Black urushi is made...
...and applied with a paintbrush. Matte areas
are have been sanded.
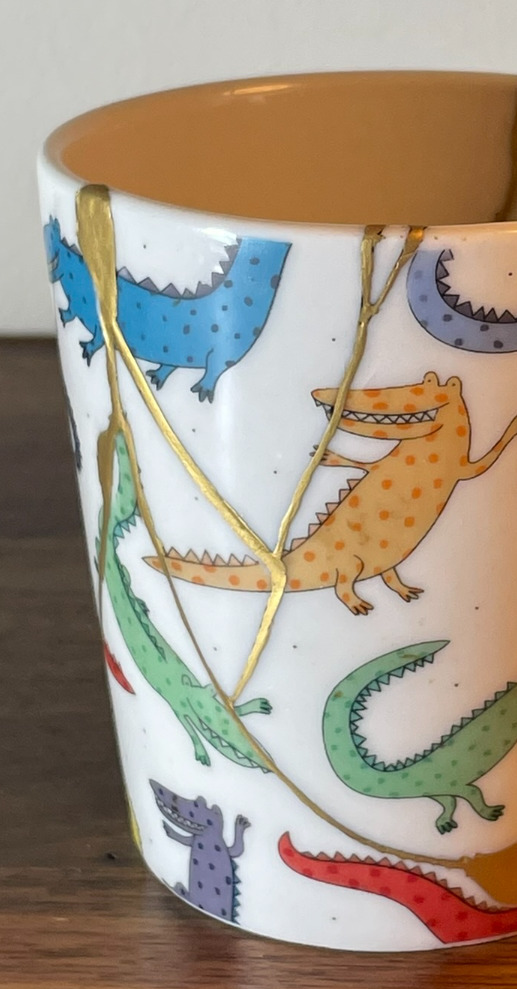
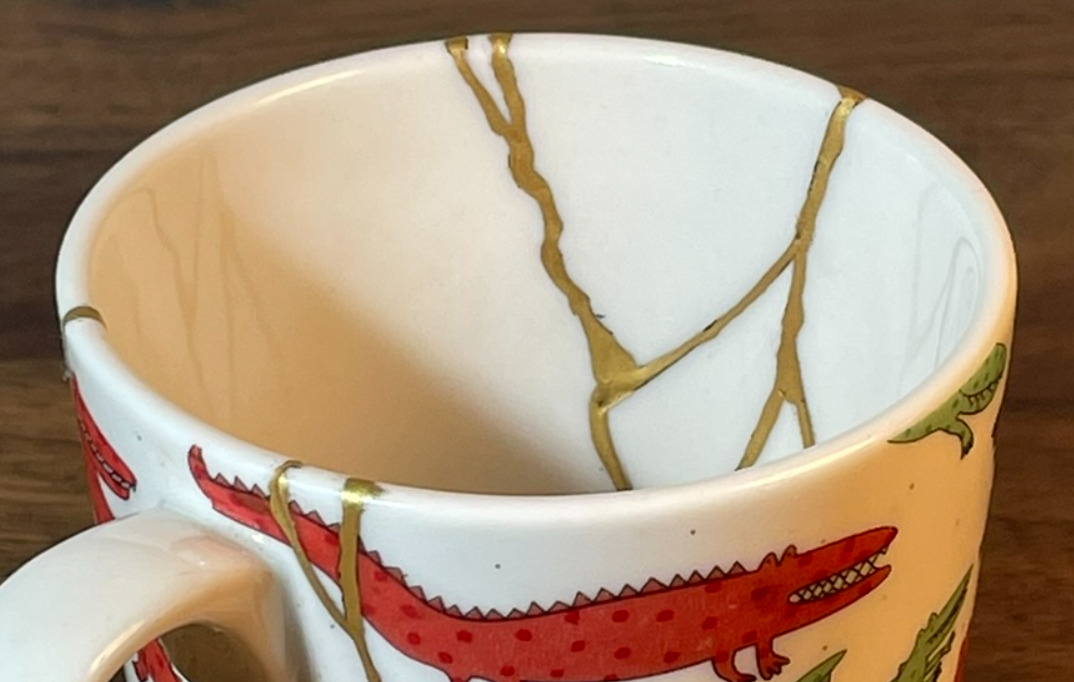
Step 4: gold dust on bengal red urushi
This is the finish line! Several months of mixing exotic compounds
together, painting, brushing, sanding, and a
lot of waiting for
urushi to cure have led up to this moment. The final layer of lacquer is
applied at this stage. I'm going for a gold finish on my mug, and the
recommended base layer for this is
bengal red urushi. Painting or
sprinkling gold on top of red or earthy materials is apparently an old
trick to improving the overall color of the final result.
Bengal red urushi is made in exactly the same way as black urushi lacquer,
but uses red mica powder instead of black. The process of painting it is
also the same—i.e. frightfully difficult, even more so because this is the
final layer and there is
nowhere to hide your mistakes. No
pressure, hope you have steady hands.
After painting the bengal red base layer, you want to let it sit for a
while: it must be tacky but not liquid. 15-30 minutes, ish. Yeah, this was
also a point of worry for me. Experienced kintsugi artisans can probably
glance at the bengal red and know that it needs a few more minutes before
it is ready for gilding. I don't, I only have data: I spent 15 minutes
laying down the bengal red base coat, I waited exactly 30 minutes after
the last brush stroke before applying the gold powder. The room I worked
in was at 25.3°C with a relative humidity of 71.3% and the CO
2
levels hovered around 480 ppm. There was a full moon and a thunderstorm,
in case you wondered. After 30 minutes, the bengal red urushi was just a
tad too liquid when I started applying the gold powder.
Mistake 7: Not waiting long enough before applying gold
powder and smearing the lacquer.
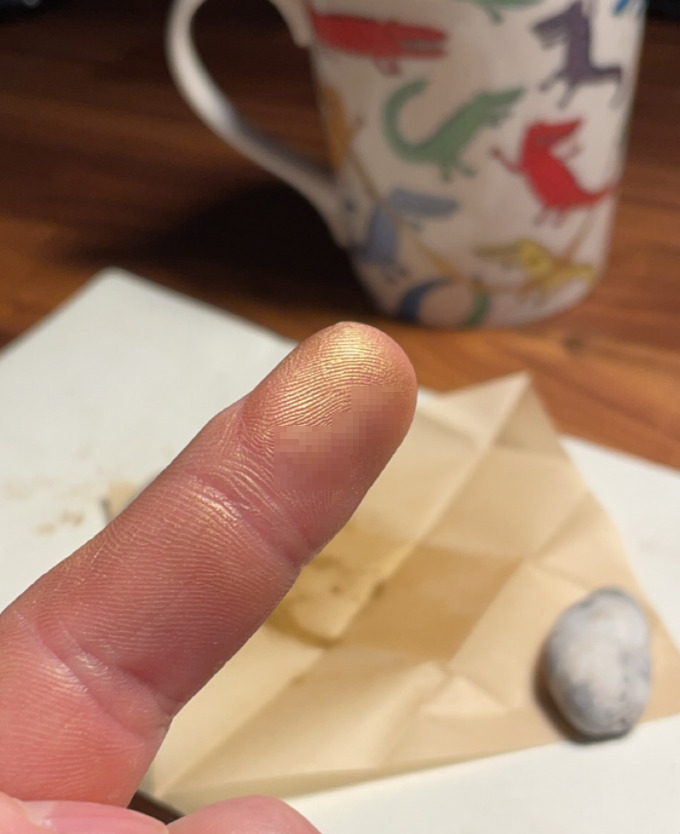
A significant driver of the cost of the kintsugi kit I purchased was the
small amount of astonishingly fine gold powder that came with it.
Included were also a couple of balls of pure silk (because why not)
that, when coerced into small balls, will hold a small amount of gold
powder. Carefully, I brushed the gold-laden silk balls across the lines
of bengal red urushi and watched as they transformed, in the blink of an
eye, from earthy red to brilliant gold, as if by magic. That is, until I
applied a bit too much pressure and smeared some of the lacquer and made
a mess of a couple of parts of the seams. All in all, though, I believe
this part went okay. Far better than I feared, at least.

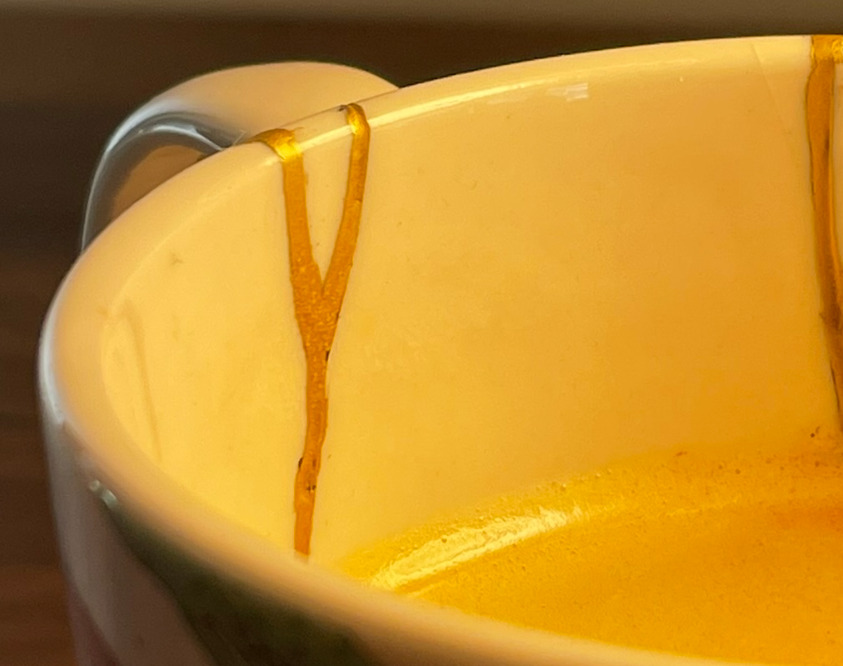
Bengal red urushi is applied before gold
powder
Goldfinger!
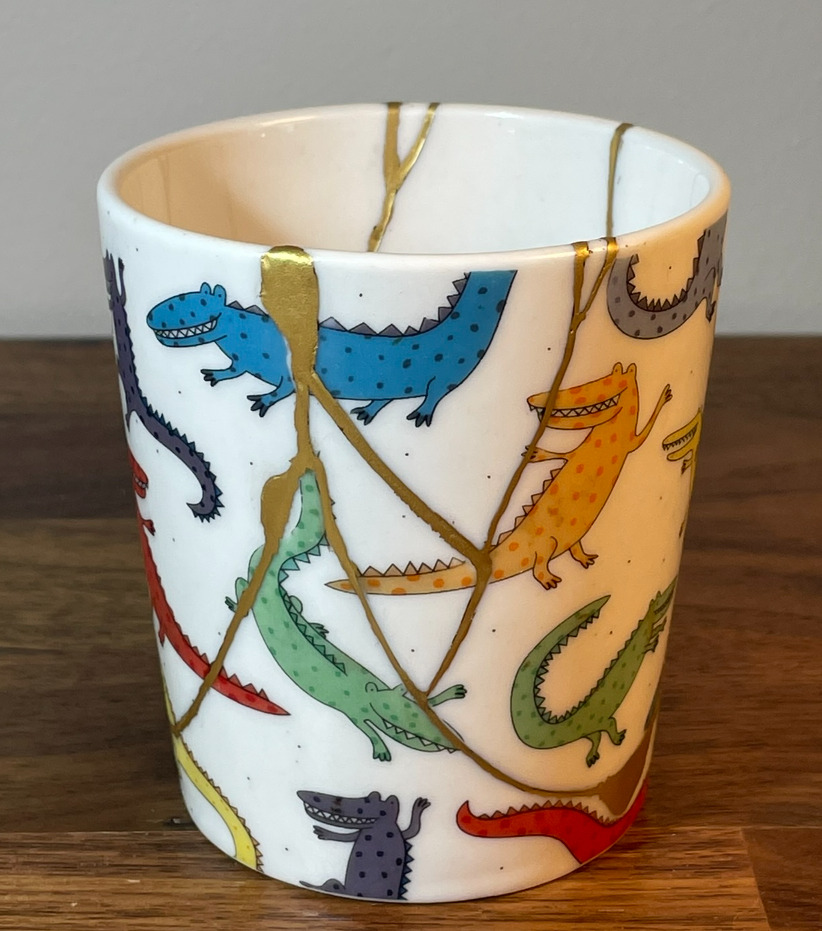
Final results
After a couple days in the urushi box, this is what I was greeted with.
It's not perfect by any stretch of the imagination, but I'm glad I had the
opportunity to dip my toes in the art of kintsugi. I'm also very excited
to finally have my mug back.